Did you like this post?
In this tutorial we will walk through the process of creating a
grunge poster. We will cover techniques like creating diamond shaped
patterns, knocking out white backgrounds and keeping layer
transparency. This tutorial includes a text version as well as a video
version. Both cover the same techniques so take what you prefer and
enjoy!


Name this layer Pattern One. Choose Edit > Fill. In the Use drop down box, click on Pattern. Then click on the Custom Pattern drop down arrow to select the Pattern we just created. It will be the last in your list. Then click OK.


Now click on the Gradient Tool and make sure the gradient is a black to white gradient.


Note: If you don’t have Illustrator, you can open it inside of Photoshop and then manually copy and paste it in. Secondly, if you don’t have Illustrator, you should get it!


Press CTRL + I to invert the alpha layer. Now CTRL Click on the Channel thumbnail to create a selection. Copy and Paste this into your main Photoshop document.


\


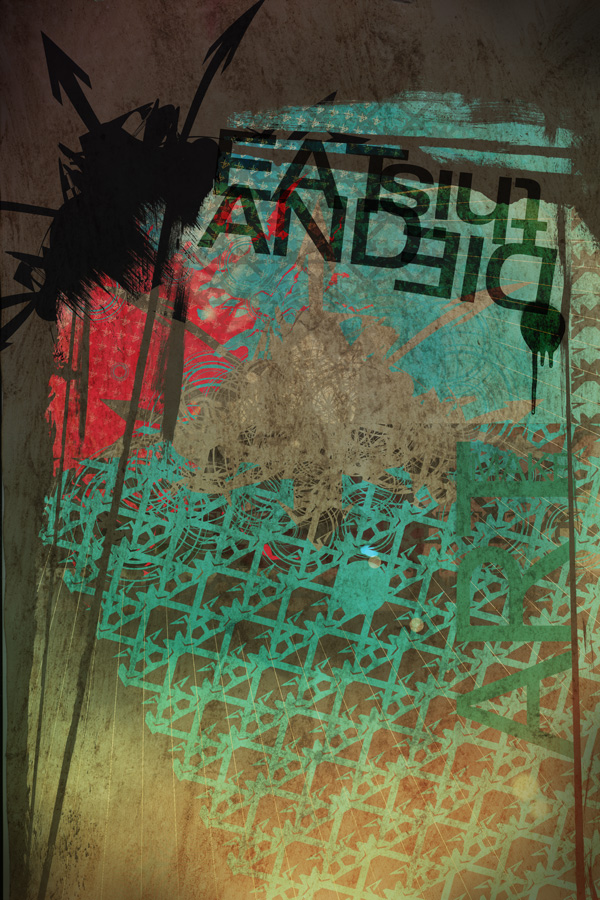
Final Image Preview

Video
This video tutorial covers everything in the text version below but as a neat video.Step 1
Open up Photoshop and create a New Document. Make the size 2846 x 4267 at 300 ppi.
Step 2
Change the foreground color to a nice blue. For the color type in #4DC8F0 and click OK.

Step 3
On the toolbar select the Rectangle Marquee Tool. Now select about half of the document and fill it by pressing ALT + Backspace or use Edit > Fill.
Step 4
With the Rectangle Marquee Tool still selected, select the other half (the white area) and use the color #505050 to fill that area.
Step 5
Open the resource support files for this tutorial and open the Render.png file in Photoshop. Edit > Copy and Edit > Paste this file into your main document.
Step 6
Double click on this Render layer. This will bring up the Layer Styles window. Click on the checkmark for Color Overlay. In the Color Overlay options click on the color picker and type in the color #F1496D
Step 7
Now we are going to make our own pattern. Create a new document and make the size 400 x 350 at 300 ppi.
Step 8
Click and hold on the Lasso Tool to bring up the Polygonal Lasso Tool.
Step 9
Now make a cool looking shape. Try holding down SHIFT while using the Polygonal Lasso Tool to create perfect straight lines. When your done with your shape make sure you connect it at the end. It will show an O next to the Polygonal Lasso Tool icon.
Step 10
Now create a new layer. Press D on your keyboard to reset your colors to the default White and Black. Now fill your shape with black. You can do this by pressing ALT + Backspace.
Step 11
Duplicate this layer and then press CTRL+T to bring up the transform box. Now right click on the transform box and choose flip horizontal. Using the Move Tool, move it to the right until it looks good.

Step 12
Choose Image > Trim. Then make sure Based On is set to Transparent Pixels, and all of the Trim Away checkboxes are checked. Click OK.

Step 13
Go to Edit > Define Pattern. Name the it Pattern One and click on OK.
Step 14
Now go back to your main document and create a new layer. Don’t close this new pattern document, we will use it later.Name this layer Pattern One. Choose Edit > Fill. In the Use drop down box, click on Pattern. Then click on the Custom Pattern drop down arrow to select the Pattern we just created. It will be the last in your list. Then click OK.

Step 15
Double Click on the Pattern One layer. This will bring up the Layer Styles dialog. Click on the checkmark for Color Overlay. In the Color Overlay options click on the color picker and type in the color #505050
Step 16
Take the Rectangle Marquee Tool and make a selection around the inside of the pattern. Right click on the selection and choose Layer via Cut. This will create a new layer with only that selection.
Step 17
Now shrink the pattern down. Press CTRL + T to transform and drag the bounding box down to make it 25% smaller.
Step 18
Create a New Layer and choose Edit > Fill and use the same pattern to fill it.
Step 19
Double Click on this layer to bring up the Layer Styles dialog. Click on the checkmark for Color Overlay. In the Color Overlay options click on the color picker and type in the color #4DC8F0
Step 20
Press CTRL + T to transform and rotate it -30 degrees. Move it down as pictured below.
Step 21
Now go back to the pattern document. Go to Image > Canvas Size and increase the size by 100 pixels on the height and the width. This will add some padding to the pattern. Click OK.
Step 22
Now that you have the padding, go back to Image > Canvas Size. Increase the width and height by 200 Percent. Change the Anchor position to top left. Click OK.
Step 23
Duplicate the pattern layer and move it to the bottom right. Make sure it has about the same padding as the top left pattern.
Step 24
Now make a smaller pattern. Go to Image > Image Size and make the width 104 pixels. and click OK
Step 25
Go to Edit > Define Pattern and name your pattern Pattern – Small – Diagonal. Click OK
Step 26
Go back to the main document and create a new layer. Then go to Edit > Fill and select Pattern from the Use drop down box. Choose the last pattern we created in the Custom Pattern drop down. Click OK.
Step 27
We want the pattern white, the easiest way to accomplish this is to Invert it. Press CTRL + I to invert.
Step 25
Press CTRL + T and rotate this layer -30 degrees.
Step 28
Make sure the layer is selected and click on the Add Layer Mask button at the bottom of the Layer panel.
Now click on the Gradient Tool and make sure the gradient is a black to white gradient.

Step 29
Drag the Gradient Tool to create a mask. This will fade out the pattern. You will have to experiment.
Step 30
Open Eat_This_And_Die_Vectors.eps from the Resource Support Files inside of Illustrator. Using the Select Tool, select the circles and drag them into your Photoshop document.Note: If you don’t have Illustrator, you can open it inside of Photoshop and then manually copy and paste it in. Secondly, if you don’t have Illustrator, you should get it!

Step 31
Press CTRL + T and increase the size. Then move it into place. Press the checkmark on the top or hit Enter.
Step 32
Name this layer Circles. Double Click on this layer to bring up the Layer Styles dialog. Click on the checkmark for Color Overlay. In the Color Overlay options click on the color picker and type in the color #4DC8F0
Step 33
With the Rectangle Marquee Tool, Select an are in the bottom right of the document. We will be adding some text there.
Step 34
Fill that rectangle black and lower the opacity to 15%.
Step 35
Using the Type Tool, type in some text over the box. I typed in MAKE ART.
Step 36
Open the Brushstrokes.jpg image from the resources folder into Photoshop. Press CTRL+A to select all and then press CTRL+C to copy layer. Now open the Channels panel and click on Create New Channel button.


Step 37
Press CTRL+V to paste the data into this Alpha Channel.Press CTRL + I to invert the alpha layer. Now CTRL Click on the Channel thumbnail to create a selection. Copy and Paste this into your main Photoshop document.

Step 38
Make sure the border layer is on the very top of the layer stack.
Step 39
Double click on the layer to bring up the Layer Style dialog. Check Color Overlay box and change the color to #505050.
Step 40
CTRL Click the layers thumbnail to create a selection and fill this selection with black a couple times to make it darker. Name this Layer Border One.
Step 41
Duplicate the Border One layer and press CTRL + T and scale in the right side to fill the screen. Name this layer Border Two. Created a mask on Pattern Two and masked out a few areas so it doesn’t look so boxy.
Step 42
Set the Opacity for Pattern Two to 37%
Step 43
From the resources folder, open the Eat_This_And_Die_Vectors.eps. Select and drag the arrows into the Photoshop document.
Step 44
Name the layer Main Arrows and scale it up a bit and place them in the center. Move the Main Arrows layer to the top, below the Border and set the Layer Mode to Saturation.

Step 45
Copy and paste the Flare.jpg into your document and center it. Name this layer Flare and set the Layer Mode to Screen.
Step 46
Copy and paste the Clouds.jpg into your document and put them into the bottom left as pictured below.
Step 47
Set the Layer Mode for the Clouds to Luminosity at 27% opacity. Now create a Layer Mask for the clouds
Step 48
With a soft brush, start masking the edges of the clouds so they blend in with the other layers.
Step 49
Copy and paste Stained_Paper.jpg into the main document. Set the Layer Mode to Multiply.Make sure it is at the top of the layer stack.


Step 50
Double click on the Make text layer and set the Color Overlay to a turquoise color. I used #40968d
Step 51
Right click on the layer and choose Copy Layer Style. Then right click on the ART text layer and choose Paste Layer Style.
Step 52
Now for the main text we are going to use HelveticaNeue LT 63 Medium Extended. Type out the words EAT.
Step 53
Move the EAT layer above the the borders and set the Layer Mode to Overlay.
Step 54
Type out the rest of the text and use CTRL+T to rotate and flip the text to your liking.
Step 55
Open Drips_and_Spray_Paint_V1_1006.jpg. Select all using CTRL+A and CTRL+C to copy.
Step 56
Create a new channel in the Layers Panel and Invert the layer (CTRL+I). Now CTRL Click the channels thumbnail and copy the selection.
Step 57
Paste it into your main Photoshop document and scale it down. Put it over the DIE text layer.
Step 58
Set the Layer Mode of the spray paint to Overlay.
Step 59
Duplicate the Main Arrows layer and move/rotate into the top left hand side.

Step 60
Double click on the layer to open the Layer Style and choose Color Overlay. Choose a nice dark brown color.
Step 61
With the Main Arrows Copy layer still selected CTRL + Click on the Border One layer thumbnail. Then click on Add Layer Mask.
\


Step 62
Open Oriental.JPG and copy and paste it into your document.

Step 63
Go to Edit > Define Pattern and name your pattern Pattern – Small – Diagonal. Click OK and set the Layer Mode to Linear Dodge (Add). Set the opacity to 54%. Make sure the layer is just above the Clouds layer.

Step 64
Copy and paste This_Guy.JPG into your document just above the oriental.jpg. Set the Layer Mode to Soft Light.

Step 65
Change the Main Arrows Copy to a dark gray or black color using Color Overlay.
Step 66
Create a new layer called Gradient Top. Make sure it is at the top of the layer stack and choose the Gradient Tool.Step 67
In the options bar click on the down arrow and choose the Violet, Green, Orange gradient. Also make sure the Linear Gradient button is selected.
Step 68
Drag the Gradient Tool from the top left to the bottom right. Experiment with this.
Step 69
Now set the Gradient Top Layer to Color Dodge at 69% opacity.
Step 70
Create a Layer Mask for the Gradient Top layer. Click on the Gradient Tool and choose the black to white gradient. Make sure to select the Radial Gradient.
Step 71
Play around with masking out areas while focusing attention to the type layers. Change the Opacity to 62%.
Step 72
Finally, create a layer called Shadows on the very top of the layer stack and choose a nice soft brush at 1100 pixels.
Step 73
Paint in all four of the corners. Drop down the opacity if your think it is too much.
Step 74
You final design should look similar to this. In this tutorial we used elements from our Arrows, Brushstrokes and Drips and Spray Paint pack. Check them out and create something awesome!


Tidak ada komentar:
Posting Komentar